Charmed Prints Quilt Along: Layout Planning and Cutting


To print these instructions, download the PDF file.


Ok, let's get started on this puppy!  This week we'll begin cutting the sashing, border and bindings since the main fabrics should be already cut.  Thank goodness for precuts sometimes, eh?

But if you're like me, as soon as you get that pretty charm pack, you'll be looking at them all and pulling out all your favorites.  So if you don't mind, let's focus on the fun layout planning first.

Please ignore the fact that my design wall is my basement floor.  My real design wall is often so cluttered with UFOs that I use the floor for projects I am actually working on.  You get the bonus toys in the picture too since I'm usually so focused on my work, I don't notice all the clutter still in the picture.  Yikes!

LAYOUT PLANNING

Baby/Child Size Quilt:  Choose 36 charms.  Lay them out in a 6 row by 6 column arrangement as shown above.

Lap Quilt:  Choose 81 charms.  Lay them out in a 9 row by 9 column arrangement.

You may want to consider the value of the colors in your charms.  Since my selection is a completely random collection of prints, I pay special attention to value when laying them out.  I try my best to alternate a light value charm with a dark value charm in each row, and then stagger it in the next column.  Many of my prints have white/light backgrounds, so alternating them with the darker value charms spreads out the eye's focus.

TAKE A PICTURE!  So you don't forget how you wanted them laid out just in case something happens.  It will save you having to redo it again.

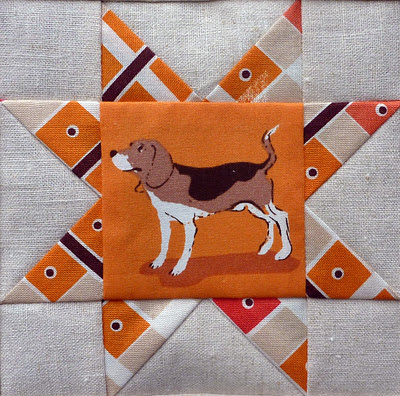
Select Feature Blocks:  After laying out the rows, begin to consider which of the charms you would possibly fussy cut for the feature blocks.  This can always change as you make the blocks, but I made a plan to make 2 of each of the 4 feature blocks.  That's a total of 8 feature blocks mixed in with the charms.  I also am planning to have each row with at least one feature block (x 6 rows), so 2 rows will have 2 feature blocks.

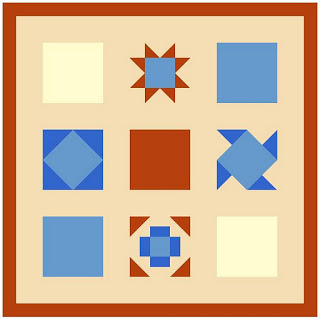
The feature blocks are:  Star, Pinwheel, Greek Cross, Diamond in the Square (clockwise, starting at the top center)

Customize!!  Here you can make your own plan.  Make more or less feature blocks.... Decide as you go....  it's completely up to you.  I mark them in the photo so I can remember which charms I want fussy cut.


Remember:  The unfinished size of your feature blocks will be the same as your charms (5" square).  So when you are looking for fun little cuties to frame in your fussy cuts, remember they will be small.  The diamond and the pinwheel have the largest feature centers with a square cut at 3 5/8".


CUTTING REQUIREMENTS
Cut, cut.  We must do some cutting prep work.  Not my favorite part, but put on some good music and let's go!  I have two tables for each section depending on what size you are making.  Hope the tables are helpful!  WOF = width of fabric.

SASHING:  Cut these strips across the width of the fabric and remove the selvage edges.
Baby/Child Quilt
Quantity
Strip
Dimensions (w x L)
Cut # WOF
Strips First
30
2 ½” x 5”
4
7
2 ½” x 37 ½ “
7
2
2 ½” x 41 ½ ”
2

Lap Quilt
Quantity
Strip
Dimensions (w x L)
Cut # WOF
Strips First
72
2 ½” x 5”
9
10
2 ½” x 57 “
15
2
2 ½” x 61 ”
3


BORDER:  Cut these strips across the width of the fabric and remove the selvage edges.
Baby/Child Quilt
Quantity
Strip
Dimensions (w x L)
Cut # WOF
Strips First
2
3 ½” x 48 “
3
2
3 ½” x 41 ½ ”
2

Lap Quilt
Quantity
Strip
Dimensions (w x L)
Cut # WOF
Strips First
2
3 ½” x 67 “
4
2
3 ½” x 61 ”
3


FLANGE BINDING:  Cut these strips across the width of the fabric and remove the selvage edges.
Quilt
Strip
Dimensions (w x L)
Cut # WOF
Strips First
Baby/Child
1” x 48 “
5
Lap
1” x 67 ”
7


BINDING:  Cut these strips across the width of the fabric and remove the selvage edges.
Quilt
Cut # WOF
Strips (2 ½” wide)
Baby/Child
5
Lap
7

Charmed Prints QAL: Schedule and Fabric Requirements


So here we are!  Week 1 of the Charmed Prints Quilt Along....  the really fun part, picking out fabric.

First, let's get the serious business out of the way.  

THE SCHEDULE:

               10/26    Quilt Along Announcement
Week 1  11/1      Schedule and Fabric Requirements
Week 2  11/8      Cutting and Layout Planning
Week 3  11/15    Star Block Instructions AND  11/16  Greek Cross Block 
Week 4  11/22    Diamond in the Square Block Instructions AND  11/23 Pinwheel Block 
Week 5  11/29    Assemble the Quilt Top
Week 6  12/6      Quilting and Finishing
Week 7  12/13    Completed Quilt

There are 4 feature blocks in this quilt.  As I mentioned, most of the charms will remain full 5" squares.  In Weeks 3 and 4, I will give 2 block tutorials each week.  I decided to separate them into Tuesday and Wednesday posts so the instructions for each block are separated.  I intentionally put the more difficult blocks in Week 3 and the easier blocks in Week 4.  Week 4 is Thanksgiving week and I assume a lot of us will have turkey hangovers and be spending time with family.  So that is why the simpler blocks are in Week 4.  I hope that helps everyone keep on pace if you're trying to finish by Christmas.

Baby/Child Size Quilt 47” x 47” (6 x 6 charms)

Lap Size Quilt 66.5” x 66.5” (9 x 9 charms)

FABRIC REQUIREMENTS:

Fabric
Child Size
Yardage Requirements
Lap Size
Yardage Requirements
Charm Pack
1 (36 charms)
2 (81 charms)
Sashing
1 yard
2 1/4 yards
Border
½ yard
3/4 yard
Flange Binding
¼ yard
¼ yard
Backing 

3 yards (2 ¼ for pieced, scrappy back)
4 yards
Batting

52” x 52”

72” x72”
Binding
3/8 yard
5/8   yard
Assorted scraps
Leftover charms or coordinating scraps for feature blocks


Note:  Most charm packs include 42 – 5” squares, but pay attention to the quantity when ordering.

Selecting your fabric:  Pick out fabric that you love!  Since most of you will be buying precuts of charm packs, the hard part is mostly done for you.  The charm pack already contains a full line of coordinating prints.  This can be an I-Spy quilt, so if you're inclined, choose a line that has some novelty prints to fussy cut in your feature blocks.
You will need to select a neutral sashing to really show off the charms and a border print that picks up one of the main colors of the charm pack.

To make the feature blocks, you will need either leftover charms or small scraps that coordinate with the fabric line you have chosen.  *Note:  The Lap size quilt uses all of the charms if you buy 2 charm packs.  This quilt is meant to be customized, both with the number of feature blocks you use and your fabric selection, so don't feel restricted to only working with the fabric line you've chosen for the charms.  I think you'll be surprised at how you can find other prints in your stash that coordinate and highlight the prints from different lines.  Everything doesn't have to be perfectly matchy-matchy unless you like it that way.


Here are my choices:  I've decided to make a "boy" quilt with blue and orange accents.

charms:  assorted charms from GXQ's Japanese Imports and Spoonflower swaps.  Plus a few other Japanese fabrics from my stash.
sashing:  Essex Linen in Natural
border/binding:  orange gingham from Riley Blake
flange:  Kona Amber (not pictured)
assorted coordinates for feature blocks:  all from my stash, picking up the oranges or blues in the charms.  Some Katie Jump Rope, some more gingham, etc....

To add a little pizzazz to finishing the quilt, I will be including a flange before adding the binding.  I plan on using a solid to give the quilt just a little punch.  This is also optional - but fun I hope!

Join in the Charmed Prints Quilt-Along!

Photobucket

WHAT:  Make a fun and simple quilt based on charm squares (5" squares).  Child's quilt or Lap quilt size instructions are given.

WHEN:  The new quilt along kicks off with fabric requirements on Tuesday, 11/01/11.  We'll be making an I-Spy sort of quilt using charm packs (5" squares) and a few "feature" quilt blocks to showcase some fussy cut charms.


All you need is a cute charm pack (child) or two (lap) to get you started!

PREVIEW:  Here's a small preview of the quilt layout (including what the feature blocks look like):

WHO:  This quilt-along is perfect for quilters of all levels.   If you've never done a quilt-along before, now's a great time to try it!  It's a lot of fun to work on the same pattern with many other quilters and to see how each quilter interprets it.  And since this quilt is designed to be customized, it will be fun to see the unique results.


CUSTOMIZE:  We will keep most of the charms full 5" squares.  There are 4 feature blocks that I will be giving instructions for.  You may add as many feature blocks to your quilt as you desire!  Love this block, but not that one?  Customize this quilt-along pattern to make a quilt that is you.

HOW TO JOIN:  The quilt-along is now over, but you may sew along at your own pace at any time.


SCHEDULE:  Each segment of the Quilt Along will be posted on Tuesdays, for 7 weeks, starting 11/1/11 and ending 12/13/11.

UP NEXT:  I'll be announcing the fabric requirements and the quilt-along schedule on Tuesday, 11/1 and telling you more about this quilt, to help you with your fabric selections. 

In the meantime, if you'd like to join in, start thinking about some charm packs you might like to use.  Any charms with a few cute little novelty squares that can be fussy cut would be adorable for this quilt!