Baby Changing Mat Tutorial using the Accuquilt GO! Baby

I've made a little tutorial for a Baby Changing Pad using the Accuquilt GO! Baby Ric Rac die.  Hope you like it!


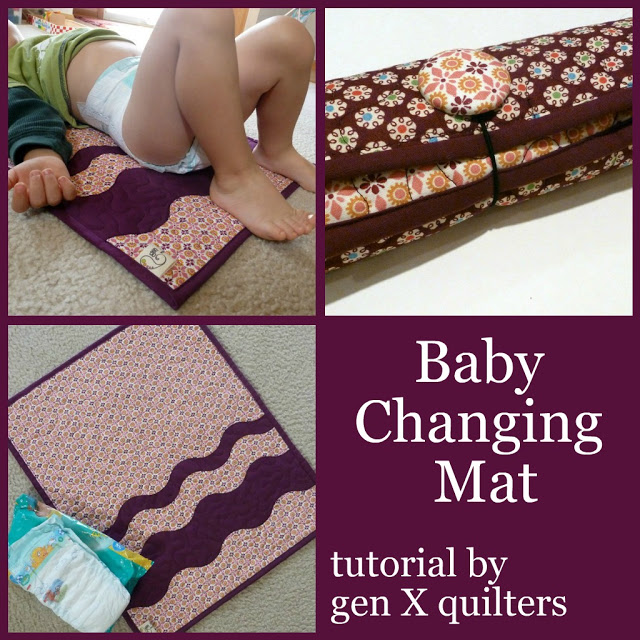
Accuquilt GO! Baby Tutorial – Baby Changing Pad using Ric Rac die
Here is a simple, yet sophisticated changing pad I made.  After all, moms want to look stylish even in the middle of messy diapers!  Remember you can always add cute embellishments, like monogramming or birthdates, on the solid to make this an extra special gift.


MATERIALS

Fabric
Yardage Requirements
Print for front
1 fat quarter (18” x 22”)
Print for backing
1 fat quarter (18” x 22”)
Coordinating solid (appliqué and binding)
1 fat quarter (18” x 22”)
Fusible web
6” x 18”
Batting
1 fat quarter (18” x 22”)
Coordinating Thread
1 spool
Elastic hair band
1
Cover Button Kit (1.5”)
1
Fabric scrap to cover button
3” diameter circle
GO! Baby dye
Ric Rac


CUTTING REQUIREMENTS
Fabric
Quantity
Dimensions (w x L)
Front
1
17” x 21”
Back
1
18” x 22”
Solid
1
6” x 17”
Solid (binding)
5
2 ¼” x 18”
Fusible web
1
6” x 17”


MAKING RIC RAC
1.    1. Place the 6” x 17” fusible web rectangle, bumpy side down, on top of the wrong side of the solid 6” x 17” fabric.  Fuse the fusible web to the fabric.  Make sure to read the manufacturer’s instructions prior to beginning for appropriate heat settings and length of time to press.


2.     2.  Leaving the paper on the fused fabrics, run the 6” x 17” piece through the ric rac dye.  The piece will fit perfectly on top of the die.  This will yield one wide ric rac strip and one thin ric rac strip.  Remove the paper backing from the strips.


ADDING APPLIQUE TO FRONT
1.     Fuse the ric rac strips (sticky or wrong side down) to the right side of the front fabric.  Place the wide ric rac strip approximately 3” up from the bottom edge of the front.  The thin ric rac strip is placed 2” above the wide strip.


2.     2. Zigzag or blanket stitch around the shapes to secure the appliqué. If you would like to add any embroidered embellishments to the front (such as a name, initials or date), do so now.

PREPARE THE QUILT SANDWICH and QUILT
1.     Baste all 3 layers together.  First lay the backing wrong side up.  Next layer the batting.  Then place the quilt top in the center of the batting and backing.  The backing fabric and batting should be slightly larger than the quilt top.  I used pin basting, but for such small projects like this, spray basting may work as well.

2.     2.  Quilt as desired.  I used a simple all-over stipple in coordinating plum thread.
3. Trim the excess backing and batting from the quilt.

BINDING
1.  1.    Use the 5 binding 2 ¼” strips to make continuous double-fold binding.  

2.   2.  I recommend using machine binding with mitered corners for this project to make it quick and easy.  Sew the binding to the back of the quilt first. 

3.     3. Turn the quilt over and sew the binding to the front.

MAKE ELASTIC BUTTON
1.   1.  Follow the manufacturer’s instructions for the covered button kit to press the button layers together.  Push the elastic band through the loop in the back of the button.  Make a knot with the elastic band around the button loop to secure the band to the button.


There you have it…  Fold the mat in half and roll it up for travel.  Secure the roll by stretching the elastic button band around it.  All done!  Hope you like it!

Cosmo Bag: Done

Consider me Travel Handmade ready!  Whew - it took some determination to make it to the end on this one.  But I'm glad to say I've conquered an Amy Butler bag pattern!

Cosmo close up

Challenges:
1.  6.25 yards of interfacing need to be applied to almost every piece cut.
2.  Instructions are clear, but need to be read very carefully.  I read each step at least 2 x before beginning.  I found I really needed to focus to avoid spending time with the seam ripper.
3.  For some reason my lining ended up larger than the exterior of the bag.  So the lining doesn't quite fit as well as I'd like it to.  As a result, there are various tucks in the fabric where the lining joins the exterior.....but unless you're really searching for them, I don't think anyone will notice.

Yes Moments:
1.  Realizing I'm SO glad I went with Modern Meadow on the outside.  Thanks to everyone who helped me decide!
2.  Pleats are not hard and I love the look they add.
3.  My first covered button.  So simple!  Must add more of these to future projects.
4.  Sewing curves....  I still need more practice, but the practice helps.
5.  Realizing the interfacing will make this bag awesomely sturdy.  This bag is constructed well.  A necessary evil I guess.
6.  Just being able to say I've made it thru an Amy Butler pattern.  It was no easy task for a quilter.  and I feel like I really accomplished something!

Here's what I'll look like carrying it at the Sewing Summit!

Me carrying Cosmo

Do I see more Amy Butler bags/patterns in my future??  Yes.  

Anytime soon?  Nope.  

For now, I've spent the past month working on this bag and know what I realized?? 

I really miss quilting.  
There's still just something about working on a quilt that's really IT for me.  

I'm gonna go cut up some squares or something....

Hello Sunshine Queen Quilt Finish

Hello Sunshine is FINALLY finished!  The individual x-block used in this quilt has always reminded me of a railroad crossing sign.  So for this quilt's finish photo shoot I decided to head to a historical village with some railroad nostalgia.

Nicey Jane Hello Sunshine #1

This quilt is queen sized for our master bedroom.  It's the first one I've made for our bed.  Yikes!  I can't imagine doing a king - this was big enough for me!  I started with a half yard bundle of 10 Nicey Jane prints that I received for Christmas.  I absolutely love how it pairs with the Kona Maize - it's so cheery and bright.

Nicey Jane Hello Sunshine #2 edited

What started out as an x-block has a lattice effect when you look at the whole piece put together.  I think it was the right choice for the garden and vintage-y florals of the prints.

Nicey Jane Hello Sunshine #3 edited

I was trying to learn how to use EQ7 when I designed this quilt (that was also a xmas present).  After having done a couple designs with the software, I have noticed it seems to overestimate yardage requirements.  When I first started this quilt, it was only to be lap size, 16 blocks.  I ended up making 42 - 14" blocks for the queen.

Nicey Jane Hello Sunshine #4 edited

I quilted it at my LQS on a HQ Avante.  I love working with that machine!  It makes doing a large quilt so easy.  It only took me about 1.5 hours to quilt the whole thing.

Nicey Jane Hello Sunshine #5 edited

I know you can't see very much of the quilt, but I just love this bench shot.

Nicey Jane Hello Sunshine #6 edited

I uses one of the green prints for the binding, and struggled with whether I should hand or machine bind it.  In the end, getting it done quick won out.

Nicey Jane Hello Sunshine #7

Overall, I'm really happy with how it came out and it's really warm to sleep under at night!