Patchwork Auditions

This is the official announcement of something unofficial.  What on earth does that mean?

I've been thinking for a while that I would love to explore different coloring options for classic quilt blocks.  So many times, we become ingrained to see blocks colored a certain way.  Our brain only sees it that one way.

I began thinking about this while designing the Vice Versa blocks.  For those blocks, we made 2 of the same block - only reversed the colors.  One block was made the traditional way, the second block put the color in the background and inverted itself.  That was so much fun to do, it made me think that we are constantly missing a million other ways to color popular blocks.

I'm introducing a new series, called Patchwork Auditions, that will look at some classic blocks and expose some alternate colorings.  I want to look at the structure of the block and re-imagine color placements.   I'm going to focus on some great beginner blocks.
So what's the unofficial part?
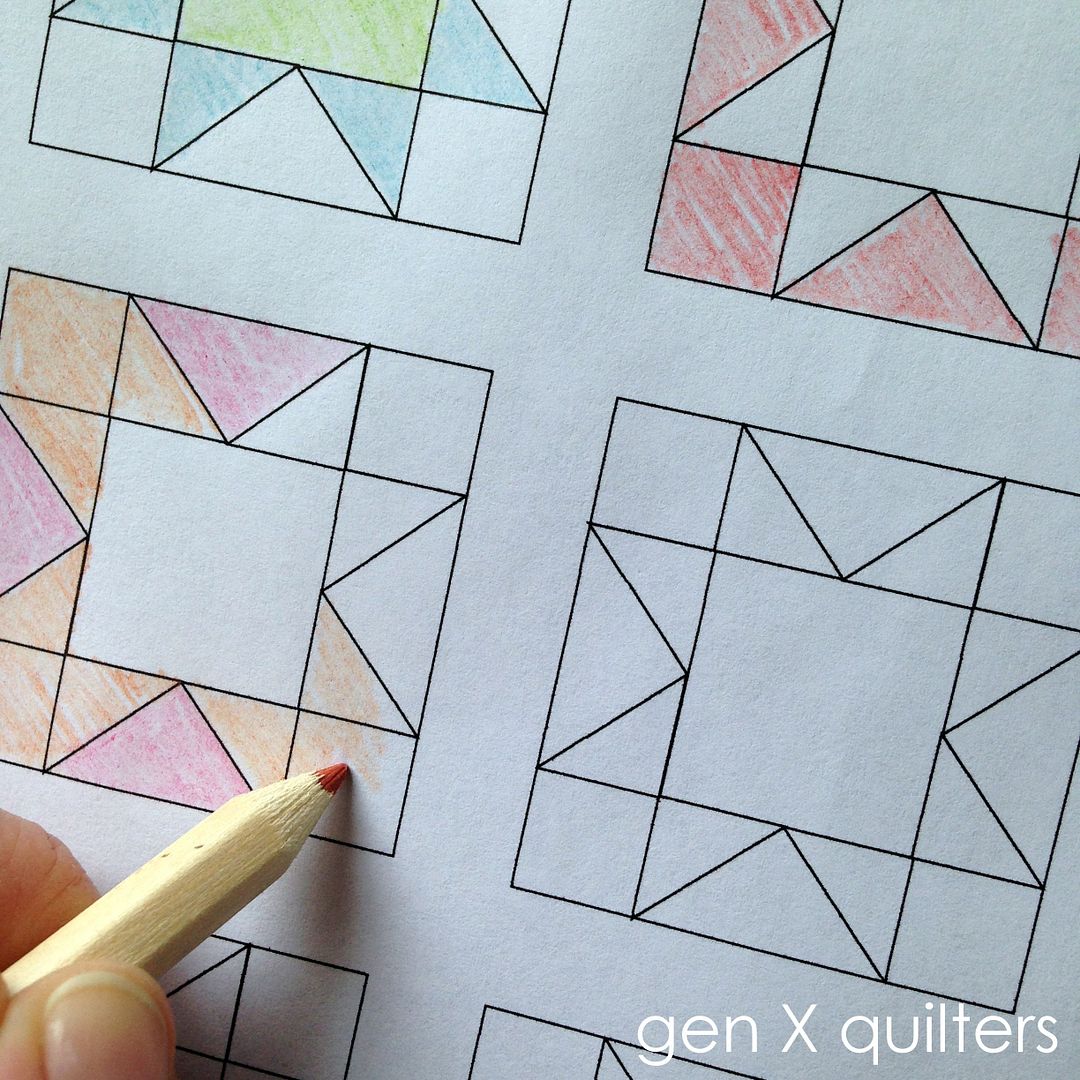
I'm going to do this casually, which is a little out of character for my type A personality.  I don't have a plan, a schedule, a list of blocks, or a layout designed for a quilt.  I simply want to think about the blocks and make one.

Eventually, I'll put them together into a scrappy quilt.

You are certainly welcome to join me!  I'll be giving cutting instructions for the basic block in 12" and 16" finished blocks, but not a tutorial.  I hope that you'll audition other color arrangements as I am.  Or maybe make a ton of variations of the same block.  I'll keep a log of the Patchwork Audition blocks here.

Scrappy Market Tote Take 1

Amanda Jean of Crazy Mom Quilts scrap madness is absolutely inspiring.  I look at her work and think "Wow!  Now if only I could do that with my scraps!".  Amanda's projects had me up at night.  I wanted my own scrappy bag (market style) for hauling my stuff when I teach.
Here's take 1.  Somehow, in my mind, it's kind of....meh.  I think I'm too close to my scraps.  i.e. I know exactly what quilt/project each scrap comes from - and I have a hard time separating it from that previous use.  To me, it ends up looking too hodge podge.  And not enough cute scrappy.  Does this ever happen to you?  I want so much to see past its previous use...

This is my trial run.  It's a mash up of things I like in market bags.  I wanted a scrappy gusset, so the sides and bottom are one long continuous scrappy piece. I like the form of the bag - just not my darn scraps!
There will be another.  Maybe with a jelly roll.  Does that defeat the purpose?

Friendship Star Block Tutorial

It's been a while since I posted a quilt block tutorial for you, so I thought I'd do one for this version of the Friendship Star.  I found it called Simplex Star (by Hearth & Home) somewhere, and I'm sure it has a few more names too.  I think we mostly recognize it as a slightly different coloring of the Friendship Star.  Choose to make the block your own style by coloring all the half-square triangles one color like the block on the left. Or make it a rainbow of color like the block on the right.


Friendship Star Block.        Finished Block is 9"
As always, read through the instructions start to finish before beginning your blocks.  I have shown two different colorway options - and you can choose which one you like in the Cutting Instructions below.

----------------------------------------------------------------------------------------------------------
Cutting Instructions. (Multi-color block - shown right above)

From Blue Background, cut:
* (4) 4 1/4" x 4 1/4" squares.   (Half-Square Triangles aka HSTs)

From Green Solid, cut:
* (4) 3 1/2" x 3 1/2" squares.  (corners)

From Light Blue Solid, cut:
* (1) 3 1/2" x 3 1/2" square.   (center)

From Yellow, Red, Navy and Purple Solid, cut:
* (1) 4 1/4" x 4 1/4" squares.  (Half-Square Triangles aka HSTs)

-You will make 2 HSTs of each color using the HST method described below.  We will only need 1 HST of each color for this block.  Use the extras to make a second block!

Alternate Colorway. The alternate colorway in the picture above (left) shows only 1 Color in the HSTs. To do this, omit cutting the Yellow, Red, Navy and Purple Solids. Instead...

You only need to cut *(2) 4 1/4" x 4 1/4" squares of Green Solid and (2) 4 1/4" x 4 1/4" squares Blue Background.
----------------------------------------------------------------------------------------------------------

Piecing Instructions.    *Use a scant 1/4" on all seam allowances.

Make Half-Square Triangle (HST) units.
1. Draw a diagonal line on the wrong side of the 4 1/4” x 4 1/4” Blue Background squares.
2. Layer (1) Blue square atop (1) 4 1/4” x 4 1/4” Red square with right sides together. Sew
the pair together, stitching 1/4" away of each side of the drawn line.
3. Cut the pair apart along the drawn line to make two HST units. Press. Repeat this step as needed. We will need (4) HSTs for the block.

The HSTs should be squared up to: 3 1/2" (unfinished size)


Layout Block.
4. Layout (4) Half-Square Triangle Units, the 3 1/2” x 3 1/2” Light Blue center square and (4) 3 1/2” x 3 1/2” Green squares.

5. Sew the units together into the three rows. Alternate the direction the seams are pressed. I like to press the seams from the top and bottom rows out toward the HSTs and press the middle row seams in toward the center square.


6. Sew the three rows together to complete the block. Press all seams.

Block size: 9 1/2" unfinished / 9" finished